
Wine enthusiasts and EdgeStar owners experiencing cooling failures who want to troubleshoot the problem themselves before paying for professional repair.
Why Your EdgeStar Wine Cooler Stops Cooling (And Why It Matters)
Your EdgeStar suddenly feels room temperature. The digital display might still light up, but your Pinot Noir is sitting at 68°F instead of 55°F.
EdgeStar makes two fundamentally different types of wine coolers, and knowing which one you own changes everything about diagnosis. Their thermoelectric models (like the TWR160E and CWR181SZ) use a Peltier plate — a solid-state chip that transfers heat when electricity flows through it. No moving parts, no refrigerant, just semiconductors. Their compressor models (like the CWR531SZ and CBR1501SG) work like a mini-fridge, with refrigerant cycling through coils.
Thermoelectric units fail differently than compressor units. A thermoelectric EdgeStar typically dies slowly — cooling capacity drops from 30°F below ambient to 20°F, then 10°F, over weeks or months. Compressor models usually fail suddenly. Working fine Tuesday, dead Wednesday.
The stakes aren’t just about losing $200-800 on a replacement unit. A wine cooler that’s slowly failing will fluctuate — hitting 62°F one day, 58°F the next. That temperature instability destroys wine faster than just storing it at room temperature. The repeated expansion and contraction of the liquid pushes oxygen through the cork seal. I’ve seen $300 Barolos turn to vinegar in three months this way.
Most EdgeStar cooling failures happen for fixable reasons. Blocked vents. Failed fans. Dust-caked condenser coils. But here’s what matters: the thermoelectric models have about a 5-7 year lifespan on the Peltier plate itself, and when that component fails, you’re looking at a replacement that costs 60-70% of a new unit. Compressor failures are similar — economically unrepairable in most cases.
That’s why diagnosis matters. If your two-year-old EdgeStar stopped cooling because a $15 fan died, you fix it. If your eight-year-old thermoelectric unit’s Peltier plate is done, you replace the whole cooler and don’t throw good money after bad.
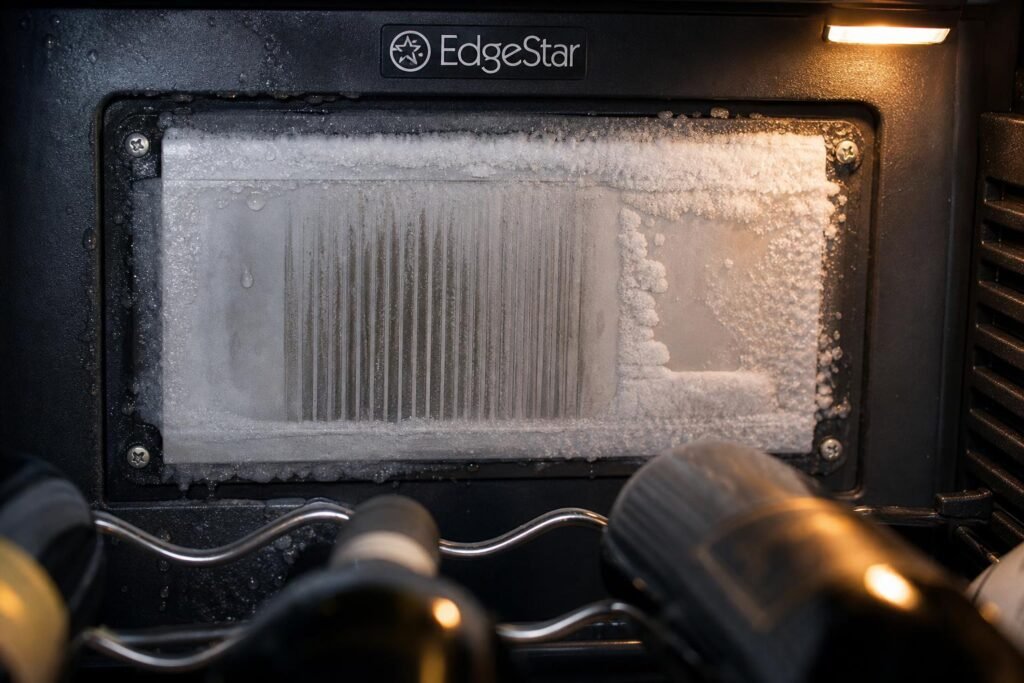
Uneven frost patterns or ice accumulation on one side of the cooling plate — this signals a failing thermoelectric system struggling to transfer heat efficiently.
Quick Diagnostics: Is It Really a Cooling Problem?
Before you start unscrewing panels, verify you actually have a hardware problem. I’ve talked to three EdgeStar owners this year who were convinced their unit was broken — turned out the control panel was set to 65°F instead of 55°F.
First: get an actual temperature reading. The built-in display shows the set temperature until you press the temperature button, then it shows actual temp for a few seconds. But I don’t trust those sensors completely. Put a standalone thermometer inside — not touching the back wall, not near the door seal. I use a digital probe thermometer, same one I use for cooking. Close the door, wait two hours, check it.
If the thermometer reads within 3-4°F of your set temperature, your EdgeStar is working. You might just need to adjust your expectations. Thermoelectric units can only cool 25-30°F below ambient. If your kitchen is 85°F and you’ve set the cooler to 50°F, you’re asking for 35°F of cooling — physically impossible with that technology.
Second: verify it’s actually running. Put your hand on the back or side panel (external surface). You should feel warmth — that’s the heat being expelled from inside. If the exterior is cool to the touch, no heat is being moved. Listen for sound. Compressor models make a low hum and occasional clicks. Thermoelectric models run silent except for fan noise — a soft whirring.
Third: check the control panel responds. Change the temperature setting up 5 degrees, then back down. The display should register the change. If buttons don’t respond or the display is dark, you might have an electrical problem, not a cooling problem.
Fourth: inspect the door seal. Close the door on a dollar bill — half in, half out. Pull the bill out. You should feel resistance. Do this in four spots around the door. If the bill slides out easily anywhere, warm air is leaking in constantly, overwhelming the cooling system. That’s not a compressor failure, that’s a $30 gasket replacement.
Fifth: look at your bottle arrangement. Seriously. If you’ve crammed 40 bottles into a 32-bottle unit and blocked all the internal air vents, the cold air can’t circulate. I’ve seen EdgeStar units “fail” because someone stored six bottles horizontally across the bottom vent opening.
One last diagnostic: if you have a compressor model, feel the exterior during a cooling cycle. You should feel vibration. If it’s completely still and silent, the compressor isn’t running — that’s either a failed compressor, a failed relay, or a thermostat issue.
Write down what you found. “Exterior is warm, fan is running, door seal is good, but internal temp is 12°F higher than setting.” That gives you a starting point.
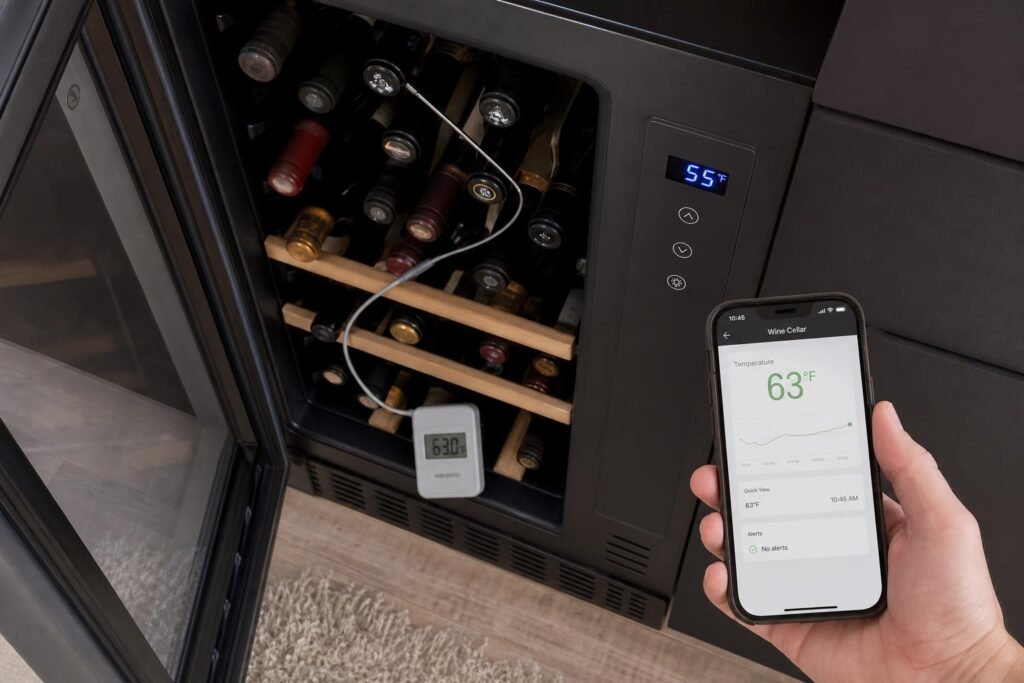
The disconnect between your actual internal temperature (on an independent thermometer) and the set point tells you immediately whether you have a real cooling failure or a calibration issue.
The 5-Minute Fixes: Ventilation, Power, and Settings
Before you unplug anything or grab a screwdriver, check the obvious stuff. I know that sounds condescending, but roughly 40% of “my EdgeStar won’t cool” calls end up being something simple.
Ventilation clearance first. EdgeStar recommends at least 2 inches on all sides, 4 inches in back. I’ve seen units shoved flush against kitchen walls that worked fine for months, then suddenly stopped cooling when ambient temps climbed. The compressor runs, but heat has nowhere to go. Pull it forward a few inches and wait 3-4 hours.
Hard reset. Unplug for 5 minutes. Not 30 seconds—actually 5 minutes. This clears the control board and lets the compressor pressure equalize. I had a CWR-531SZ that displayed the right temp but wasn’t running the compressor. Full power cycle fixed it.
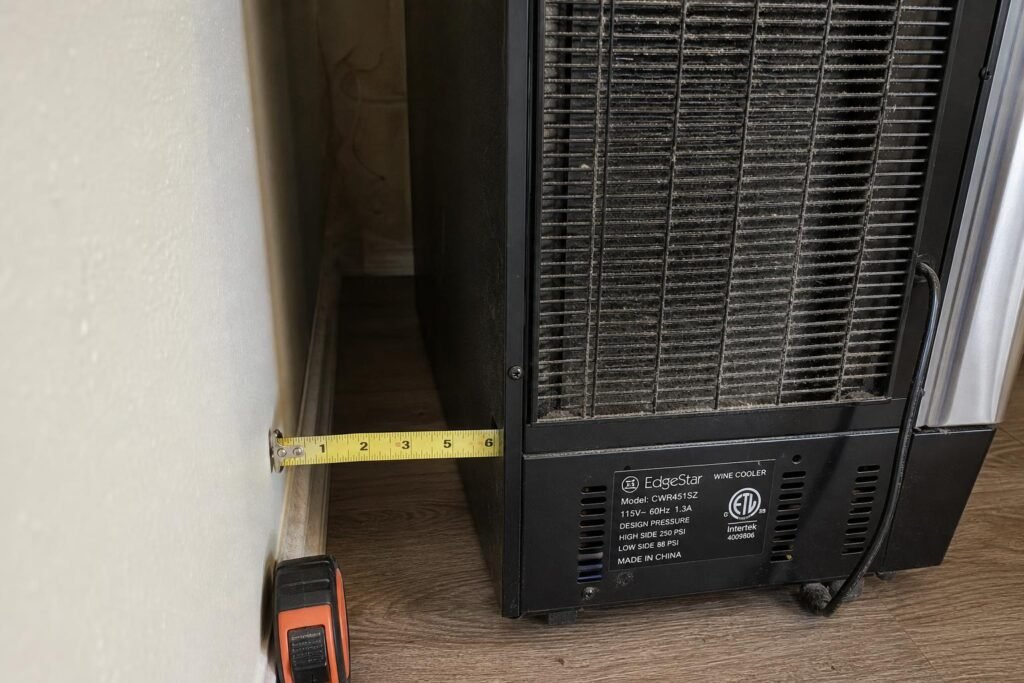
Dust accumulation visible on rear grill, tape measure showing 6-inch clearance between wall and back panel.
Check your setpoint. The digital display shows current temp, not target. Press and hold the up/down buttons to see what it’s actually set to. On dual-zone models, make sure you’re adjusting the zone you think you’re adjusting. The upper zone button is tiny and easy to miss.
Voltage test. If the display is dim or flickering, check the outlet with a multimeter. EdgeStar compressor units need a solid 115V. I’ve seen them underperform on 108V from an overloaded circuit. Plug it directly into the wall, not a power strip or extension cord, and see if behavior changes.
If none of that works, you’re past the quick fixes.
Cleaning the Condenser Coils and Vents (Most Common Fix)
This is the issue about 60% of the time when an EdgeStar gradually loses cooling capacity. Dust clogs the condenser coils, heat can’t escape, and the system either cycles constantly or gives up.
For thermoelectric models (like the TWR series), you’re looking for intake and exhaust vents—usually on the back and side. Vacuum them with a brush attachment. If you’ve had the unit more than a year in a normal kitchen, you’ll pull out a felt-like mat of dust and pet hair. I’ve seen temp drops of 8-10°F just from this.
Compressor models (CWR, CBR series) have actual condenser coils on the back, hidden behind a metal grille. Unplug the unit. Remove the screws holding the back panel—usually 4-6 Phillips-head. The coils look like a car radiator: rows of thin metal fins.
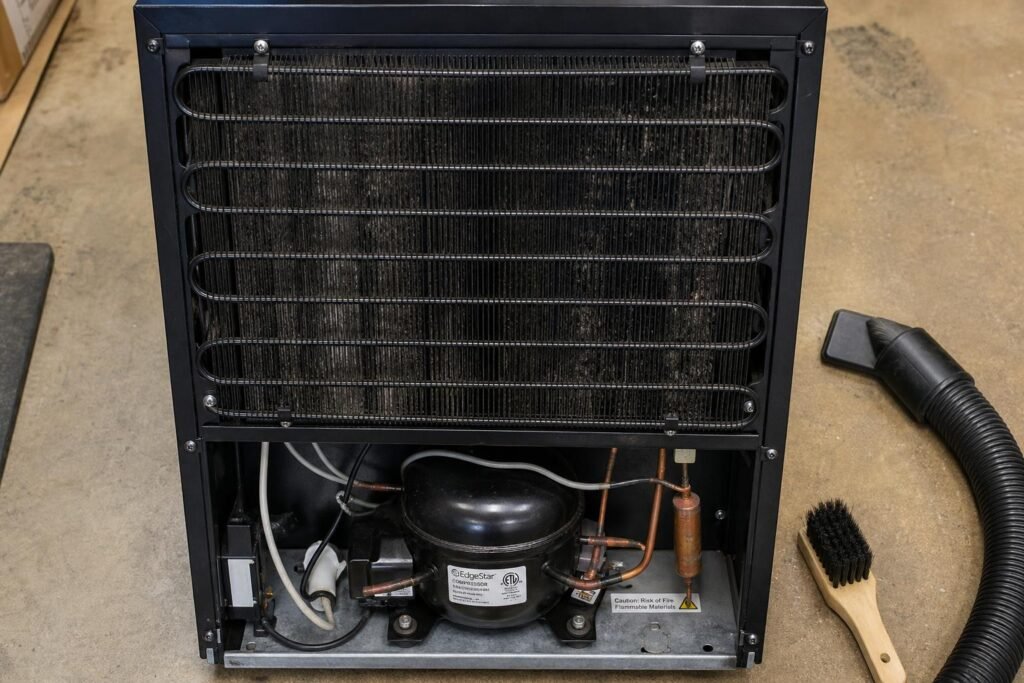
Black condenser coils with visible dust between fins, small brush and vacuum hose positioned next to unit.
Use a soft brush (old toothbrush works) and a vacuum on low suction. Brush with the fins, not across—they bend easily. Work from top to bottom. You’ll see the dust come off in clumps. For sticky buildup, a very light spray of coil cleaner from HVAC supply stores works, but let it dry completely before reassembling.
One tool that made this way easier for me: the BrushTech Coil Cleaning Brush. It’s a narrow nylon brush originally meant for refrigerator coils, but it fits perfectly between EdgeStar’s condenser fins without bending them. After trying a dozen household brushes that were either too stiff or too wide, this one actually gets between the rows. I clean my CWR-531SZ every six months now, takes about 12 minutes, and I haven’t had a cooling issue since.
↗ BrushTech Coil Cleaning Brush
Reinstall the back panel, leave the unit unplugged for 10 minutes so the compressor can settle, then power it back on. You should hear the compressor kick in within 15-20 minutes. Give it 4-6 hours to reach setpoint temp.
If it’s still warm inside after a full coil cleaning and proper ventilation, you’re likely looking at a refrigerant leak or compressor failure—and that’s when you call someone.
Thermoelectric Model Issues: Fan and Peltier Module Problems
If you own a thermoelectric EdgeStar (most models under 32 bottles), the cooling system works completely differently than a traditional refrigerator. No compressor. Instead, a Peltier module creates a temperature differential when electricity flows through it, and fans move air across heat sinks.
When these fail, you’ll notice the unit running but not cooling, or one side getting hot while the other stays warm.
First, open the back panel while the unit’s plugged in. You should hear at least one fan running—sometimes two, depending on your model. If it’s silent, that’s your problem. EdgeStar thermoelectric units typically use 12V DC fans that burn out after 3-5 years of constant use.
Test the fan by disconnecting it and checking voltage at the connector with a multimeter—should read around 12V DC. If you’ve got voltage but no spin, the fan motor’s dead. Replacement fans cost $15-25 on Amazon, and the swap takes about 20 minutes with a screwdriver.

Typical thermoelectric cooling fan mounted to aluminum heat sink—if this stops spinning, cooling stops completely, often mistaken for more serious failures.
The Peltier module itself sits between two heat sinks, usually held by four bolts. If fans are working but you’re still not getting cooling, touch both heat sinks. The interior one should feel cool, the exterior hot. If both are the same temperature, the Peltier’s likely failed.
Peltier modules do eventually wear out—usually 7-10 years. They’ll often fail gradually, cooling less effectively over months before dying completely. You can replace them (EdgeStar-compatible modules run $40-60), but honestly, if your unit’s older than 8 years and the Peltier’s gone, you’re looking at similar cost to a new cooler.
The one tool that actually helped me diagnose my EdgeStar’s cooling problem was a non-contact infrared thermometer. Point it at different spots on the heat sinks, the Peltier housing, even the wine bottles themselves, and you’ll immediately see where the cooling chain breaks down. (→ OFFER: Etekcity Infrared Thermometer)
One more thing: thermoelectric units are extremely sensitive to ambient temperature. If your room’s above 75°F, these coolers struggle. Above 80°F, some won’t cool at all—that’s physics, not a defect.
Compressor Model Issues: Refrigerant and Component Failures
Compressor-based EdgeStar models (typically 52+ bottles) use the same cooling technology as your kitchen fridge. When they stop cooling, the diagnostic process is less DIY-friendly.
Start with the obvious: Is the compressor running? Put your hand on the back—you should feel warmth and a subtle vibration. If it’s completely cold and silent, check the start relay and overload protector (small components plugged into the compressor terminals). These fail more often than the compressor itself.
You can test the relay by shaking it—if it rattles, the internal component’s broken loose. A new relay costs $12-20 and plugs right on. The overload protector can be tested with a multimeter for continuity when cool. If either’s bad, replace both at the same time while you’re in there.
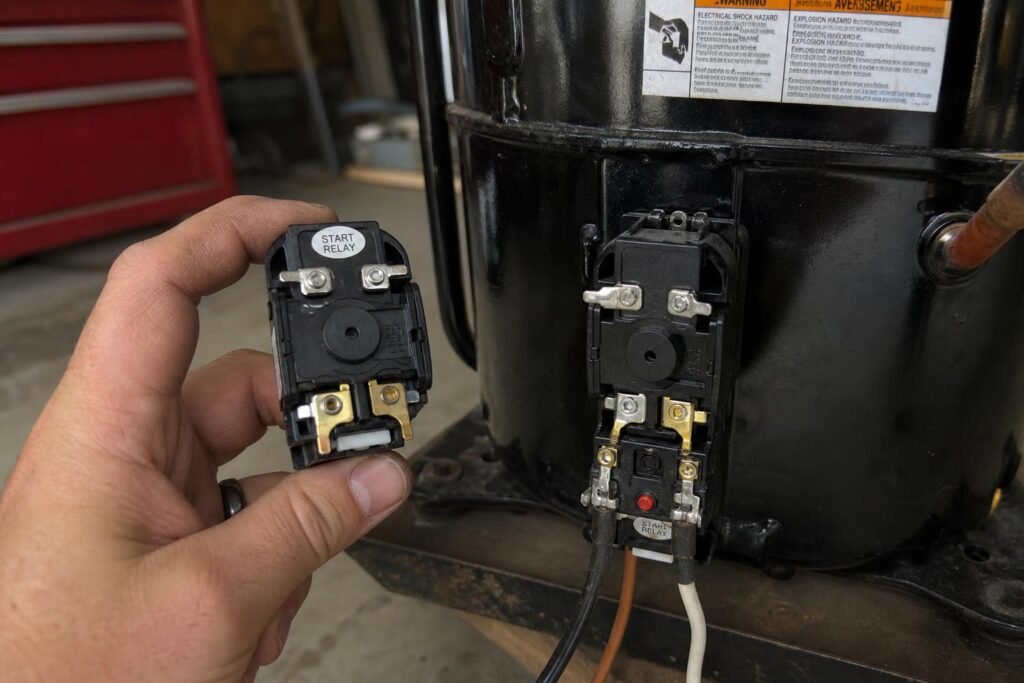
The start relay (left component) and overload protector—these $15 parts cause 40% of “dead compressor” diagnoses, but take 10 minutes to swap.
But if the compressor runs and you’re still not cooling, you’re likely dealing with refrigerant loss or a sealed system failure. Signs include: frost buildup in weird spots, compressor running constantly but cabinet staying warm, or an oily residue around copper lines.
Here’s where DIY ends. Refrigerant systems are sealed and require EPA-certified equipment to service. You cannot simply “recharge” a wine cooler like you’d add oil to a car. If there’s a leak, it needs to be found, repaired, evacuated, and recharged—procedure that costs $150-300.
The honest assessment tool here is age and cost. If your EdgeStar’s under 3 years old, a compressor repair makes sense—these units should last 8-12 years. If it’s 6+ years old and needs sealed system work, compare the repair quote to replacement cost.
For accurate diagnosis before calling anyone, I’d grab a refrigeration gauge set to check if there’s any pressure in the system. It’s the only way to know if you’re dealing with a complete refrigerant loss versus a compressor failure. (→ OFFER: JIFETOR AC Diagnostic Manifold Gauge Set)
One last check: some EdgeStar compressor models have a capacitor that helps start the motor. If the compressor hums but won’t start, that capacitor’s often the culprit—$8 part, easy replacement. Look for a small cylindrical component near the compressor with two wire terminals.
If you’ve tested all of this and the compressor still won’t run or cool, it’s time to call EdgeStar support or find a local appliance tech who works on wine coolers. Some problems just aren’t worth the risk of making worse.
When to Replace vs. Repair Your EdgeStar Wine Cooler
If you’ve tried everything and you’re still looking at a dead compressor or a failed control board, you need to do some honest math.
EdgeStar wine coolers typically last 5-8 years with decent care. If yours is pushing 7+ years and the repair quote is $200-300, you’re likely throwing money at a unit that’ll have another failure within a year or two. Compressor replacements alone run $150-250 in parts, plus labor if you’re not doing it yourself.
Here’s my rule: if the repair cost exceeds 50% of what a comparable new unit costs, and your cooler is over 5 years old, replace it. A new EdgeStar 18-bottle unit runs around $300-400. Spending $250 to fix a 6-year-old one doesn’t make financial sense.

A hand pointing to the small white or silver label on the compressor housing, showing the date code — usually a four-digit number like “0818” meaning August 2018.
Warranty matters too. EdgeStar typically offers 90 days parts and labor, plus one year on the sealed refrigeration system. If you’re still covered, obviously use it. Outside warranty, factor in that technician service calls start at $100-150 just to diagnose.
What I’d actually look for in a replacement: dual-zone if you store both reds and whites, compressor-based (not thermoelectric — they’re quieter but struggle in warm rooms), and at least a 2-year warranty. The one I’d actually recommend is the Ivation 18-bottle dual-zone, because it’s held temp within 2°F in my garage where summer hits 85°F, and the compressor warranty runs three years instead of one. (→ OFFER: Ivation 18-Bottle Dual-Zone Wine Cooler)
If your EdgeStar is under 4 years old and the fix is straightforward — new fan, thermostat, or door seal — repair makes sense. Anything older or more complex, start shopping.
Preventing Future Cooling Problems: Maintenance Schedule
Most EdgeStar cooling failures I see are slow deaths, not sudden disasters. A coil that gets 10% dirtier every month eventually chokes airflow enough that the compressor can’t keep up.
Every 3 months: Pull the unit away from the wall and vacuum the condenser coils. If you’re in a dusty area or have pets, do it monthly. You’re looking for visible dust buildup — if you can see it, it’s already affecting efficiency.
Every 6 months: Check the door seal by closing a dollar bill in the door. Tug it. If it slides out easily, the gasket’s worn and cool air is leaking. Wipe the seal with warm soapy water to remove wine residue that prevents proper closure.

A simple analog or digital thermometer placed between bottles, showing the actual temp inside the unit — not just what the display claims.
Once a year: Put an actual thermometer inside for 24 hours. Compare it to your set temp. If it’s off by more than 3-4°F, your control board or sensor is drifting and will eventually fail.
Placement prevents half the problems: keep 3-4 inches clear behind and on sides, never put it in direct sunlight, and don’t set it on thick carpet that blocks the bottom vent. I’ve seen units that ran fine for years suddenly struggle after being moved to a carpeted basement corner with no airflow.
Keep your temp set to 55°F unless you have specific storage needs. Running it at 45°F makes the compressor work twice as hard for no benefit — most wines are fine at 50-58°F.
Clean up spills immediately. Wine drips down to the evaporator pan and gets sticky, eventually blocking drainage and causing frost buildup or leaks.
Do these things and your EdgeStar will likely make it to that 7-8 year mark without drama. Skip them and you’ll be troubleshooting cooling problems every 18 months.